Tuesday, December 30, 2014

Take Off Tote

I've been doing secret sewing on a quilt top that can't be shared which is why I haven't really been blogging. That said, I finished up my IG Mini Swap quilt, received one in turn, and have made a few other small things recently. This is a round up post of the things I've been working on other than the one big quilt top (and it will be big at 93" square).

To start: my mom's birthday quilt. It hasn't actually made it to her because of the backing, unfortunately flipping over on itself for the last column, and me not having had a chance to unpick that column of quilting to redo it then bind. That said, she knows she's getting it and has seen it in person. It fits with the color scheme of the living room at her house perfectly. And you can see that I'm now using the Singer 66 for my quilting, and the stitches are great.

Pippa wanted to show you what the extension table is really for:
 And the whole quilt laid out on my bed, which is queen sized for reference. This quilt is a throw, not full bed sized though.
 My IG Mini Swap quilt as I was quilting it. I did pebbles in the background areas.
 And here it is, unfortunately, I forgot to take a picture of it once it was bound before it went off in the mail to England.
 This is a block that I made nearly two years ago (maybe a little more). I decided it will become a pillow cover and I wanted to practice hooked swirls. I still need more practice, but adding to FMQ repetoire with small scale practice is always good.
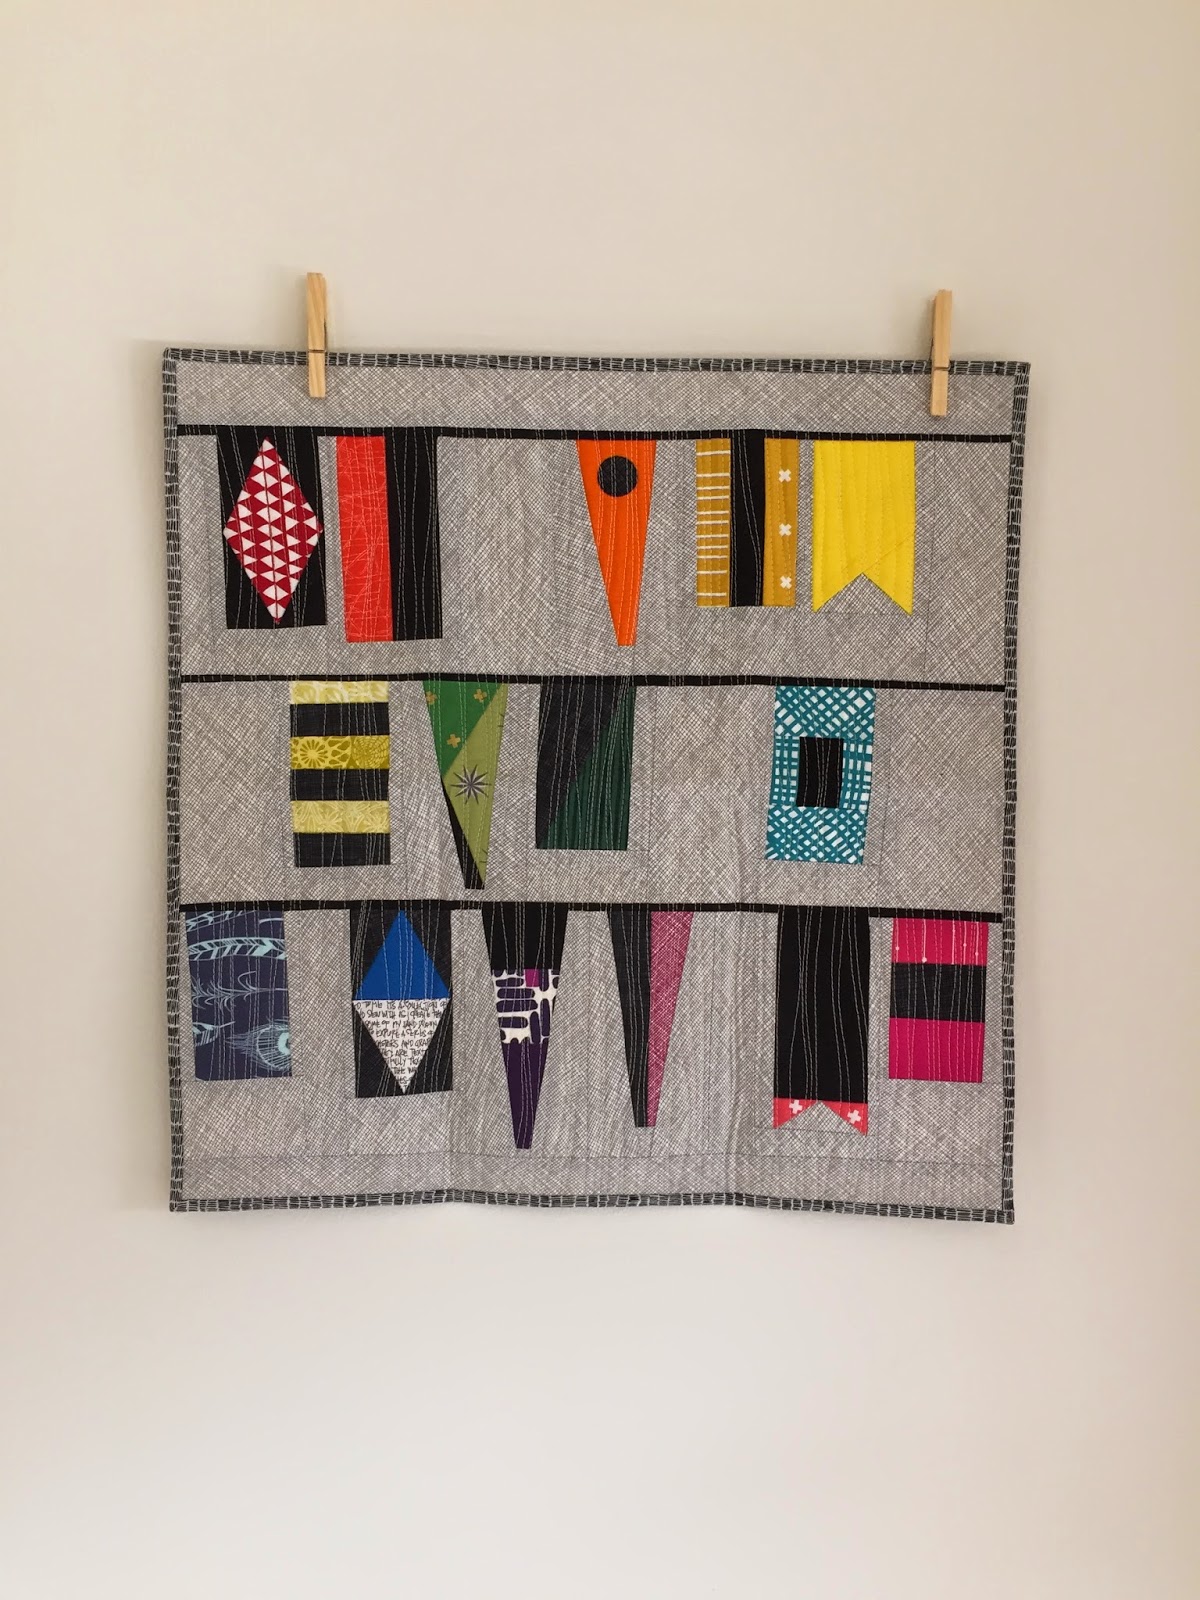
 This is the IG Mini Swap that I received. Quilts From the Attic made this for me, and he based the nautical theme off the fact that I'm in the Navy. Plus, he sent some nice goodies along.
 And here it is hanging on my dining room wall. I hung it within 20 minutes of receiving it. I love the colors and the matchstick quilting. Before you ask - no the flags don't spell anything, most of them are just made up and don't follow actual flags.
 And here is another long standing flimsy that I've had, and I decided to practice meandering feathers on the chevrons.
 And the completed mini, which will also likely become a pillow cover.
 And then lastly, over the weekend I got the pattern for the Take Off Tote from Dog Under my Desk. I love her patterns since they have photos of every step of the way. The pattern for this bag was 43 pages including the pattern pieces, around 30 of actual step by step instructions. I was never confused and it came together in about 4 hours total. I also learned a new zipper technique. Between the straps on the back, it has instead of a pocket, a slide so that it can sit on top of a rolling suitcase and not slip off. That's why it's called the Take Off Tote.  These fabrics came from Jo-Ann where I had gone to get the needed interfacing since they were on crazy sale, and I love swirls and polka dots, can't go wrong with either.
Interior has a big double pocket.
 I really like the wide open zip on the top of this, very easy to see things in the bag and not be searching for something that has slipped to the bottom. It also has a firm base, and the pattern includes a pocket to slide in a piece of cardboard, or in my case, plastic template cut to size.

Thursday, October 30, 2014

Blogger's Quilt Festival - Metro Lattice

I'm entering my Metro Lattice quilt into the Blogger's Quilt Festival  in the Small Quilt Category. I put the binding on it a couple of weeks ago and it's been out in my living room ever since (we'll ignore that I also have unbound quilts that live on the couch, too, until the spirit moves me to get my act together and finish them up).  The sequence of photos that follow are the quilt itself and the process from basting to binding. I did simple straight lines on this and bound with one of the Barcelona prints that I also used as the backing. It finishes at 48"x58".


Pippa helped me baste, as per usual. This picture sums up a lot of things: quilting, cat, and wine.

So many lines! Straight line quilting takes a lot longer than FMQ.

 I couldn't bind without my trusty wonder clips or supervisor in the background.


Wednesday, September 24, 2014

Some stipple, a new toy, and a bag

As I've referenced before, the DCMQG is the coordinating guild of 100 Quilts 4 Kids. Along with individual guild members donating quilts, the guild as a whole comes together to make group quilts. I quilted one of them last week (and will put the binding on this weekend). This one got an all over stipple.
I also started making blocks for a new quilt because I wanted to play with my new toy. which is pictured below - it's a compass rotary cutter. It makes perfect circle cuts, and thus it makes perfect quarter circles when making drunkard's path blocks. Curves have definitely become part of my piecing repertoire without the fear that once hung over them. 

And lastly, I made a pleated bag for taking to temple tonight when I started getting bored of drunkard's path blocks. I found a nice tutorial, and made it pretty quickly. The lining is royal blue which echoes the stars on the outside. It's big enough to hold my tallis, machzor, phone, and wallet. I made the handle a little longer than the tutorial called for since I like a bigger drop on my bags.

Sunday, September 14, 2014

Faux Cathedral Windows Pattern on Craftsy

The Faux Cathedral Windows pattern is live on Crafty now.

Visit my Craftsy Shop to get it

Finished! (7 months later...)

I finally put the binding on my Irish Chain made from Allison Glass streamers. I'll own that I had it out on my couch and used it back in February/March without binding because, as I've said before, binding is my least favorite step of quilt making. I used the same black print for the binding that was used for the corner stones. And one strip of the red which goes around one of the corners.


Sunday, September 7, 2014

#IGMiniSwap and a Pattern

Hello, readers, for all of you who follow on Instagram, too, you'll know that I just made a faux cathedral windows top for my IG Mini Swap partner. It got such a great response that I wrote up a pattern which is now with testers. Once I get feedback re: my pattern writing skills (this is my first one ever written so I expect LOTS of feedback since I included two experienced pattern writers in the tester group), the pattern will be released on Craftsy.

From sketch to actual mini quilt, this only took a couple of nights.


Cathedral Windows without the headache of much folding and pinning or zig zag stitching oddly folded blocks together.


Wednesday, August 27, 2014

I made another one...

The Sew Together Bag by Sew Demented is a wee bit addicting. It's such a fun bag with its zippers and pockets and fun finish of zipper that is handle. Because I like making them, and one of my best friends from college requested one from fabric that I was trying to destash via Instagram, a commissioned bag was spawned. This was the seventh one I've made and it took me just under 2.5 hours from start to finish. I love my Pfaff which can handle all the layers when putting the sides together with the body of the bag.

Along with wanting the elephants as the focus print, she said I could use any other blue that I wanted throughout. So I went with a mix of Allison Glass Streamers and V and Co Simply Style plus a solid ocean blue.

The front and back (is there really a front/back) are identical with the patchwork stripe.
 Pocket linings! It's always fun to have a little pop of the unexpected. 
 This shows the streamers as the middle two open pockets and the inside of the accordion pieces.

Wednesday, August 13, 2014

100 Quilts 4 Kids Bloghop

Welcome to the second stop on the 100 Quilts 4 Kids Bloghop!
100 Quilts for Kids

The DC Modern Quilt guild runs a charity quilt drive each year called 100 Quilts 4 Kids. It was started by Katie Blakesley of SwimBikeQuilt, the guild's former president.  This year the quilts will be donated to the Carpenter's Shelter in Alexandria, VA. For people who donate quilts there are some great prizes available! The DCMQG is also working on several group quilts. I will be doing the quilting on one of them at the September meeting. 

I'm using this is a way to push myself to finish up WIPs and using orphan blocks. 

I had a lot of fun practicing a new freemotion pattern on this quilt. It's small ~30"x40"
Quilt 2: Riley Blake Quilt Challenge Faux Cathedral Windows
This one hasn't been quilted yet, but it's also a small quilt. 
Quilt 3: Set in Hexagons measures ~50"x48"
This one will have a minky backing to make it extra soft.  Then it will be bound in red to echo the internal border. The white border will have some fun freemotion in red thread. 


Saturday, August 9, 2014

Metro Lattice - Piecing done in a week.

I'm pretty pleased with the Metro Lattice pattern to make a Double Wedding Ring quilt. This one will finish to 54"x60" once I put the connector pieces on either side; those are cut and pieced, just not ironed and trimmed so they didn't make it up onto the design wall. However, you can see the little squares on the left side that will go between them.
I'm going to have fun with free motion quilting on this one. I haven't decided if I'm going to do an all over design or custom quilting with the rings/centers being different. 

Sunday, August 3, 2014

Curves and more curves

Yesterday was the DCMQG sewing day at Finch Studio in Leesburg, VA. It was my first time in Leesburg (without being at a soccer field or the outlets). Finch is a great sewing space, and there were many little restaurants which the guild availed itself to when it was lunch time.

Since the sewing space was limited, I didn't bring the big bed quilt that I'm working on, Framed Squares, so I brought the Quick Curve Ruler and charm packs of Barcelona which I had already started sewing into HSTs to make the Metro Lattice pattern - aka Double Wedding Ring without the annoyance. In all honesty, I didn't actually buy the pattern, but was able to figure out the construction just by looking at pictures of it. I think mine is actually a little smaller than the official pattern since I used charm squares to make my centers.

This was my practice block using scraps from my polka dot quit. You can see that I wasn't super careful and matched up the purple and green cut outs (oops!), but this is why it was a practice block.

Here is my work area at Finch and then a basic layout just on the cutting mat to show what this will look like. I haven't actually done the calculations because I'm a little lazy on it, but the finished product will have 30 center squares, which should make it approximately 50"x60"


Thursday, July 24, 2014

New Toy!

So as quilters, we all know that notions = toys. I had a whole bunch if credit card rewards that I can now link to Amazon. I had been eyeing a Quick Curves Ruler by Sew Kind of Wonderful for quite some time, but it's hard to justify a $25 ruler; that becomes much easier when it becomes only $1.87 out of pocket. 

Last night to inaugurate sewing curves - my first time when it wasn't a 3D object turned out well. It helps that they have a series of YouTube tutorials to explain how to use the ruler correctly. 

If you'll remember to late June, I posted about a pink block I made for a charity quilt going to a cancer center in Grand Rapids, MI. Rather than just make blocks that would never be used, my practice blocks (that were good enough) were made in the pink theme for Anna to add to the quilt. 


While I was sewing, I had company from Pippa, who is as I write becoming less of a lady at the Spay Spot - friendly reminder it's actually bad for female cats to have repeated heat cycles without having kittens, it can cause major hormonal imbalances leading to cysts and other health issues. But as always, she was my supervisor. She probably won't be jumping quite that high for the next week or two.


Saturday, July 19, 2014

Slow times...

It's been nearly a month since the last post. I got to the end of night shift, but since I had gone on vacation in the middle of the 10 weeks for my college reunion, I got thrown into that jet lag feeling again and just wasn't feeling the draw to the sewing room.

I'm back on days now and have sunlight for working. I'm plugging along on the Framed quilt with 48 blocks done. Only 30 fit on my design wall at a time though! This was on the dining room floor, but they've since been transferred to the wall. I'm thinking of making it 86x98 instead of the full 98x98, which was the original intention.
My other project yesterday was making a scrub cap. I've started shadowing CRNAs (Nurse Anesthetists) in the OR at work in preparation for submitting my grad school paper work through the Navy. I had to wear the lunch lady mesh hair net, and decided that wasn't my thing. I went on Etsy and bought a great, simple pattern for $4 and had this made in under half an hour. It even has elastic in the back. The ones for sale there were all $12-18, which just seemed like too much for something I knew I could make easily. And the moose are so cute - it was a novelty print that I've had in my stash for a while. I will definitely be making more of these. 


Saturday, June 21, 2014

For Pinks Sakes

Welcome to the For Pinks Sakes Blog Hop!


This blog hop is being done by many quilters across the country. Each person is making at least one block for a charity quilt that will be donated to the Lemmen-Holton Cancer Pavilion in Grand Rapids, MI, where Anna Gering's Mother-in-Law, Tina, has been getting her cancer treatment. (Fun fact, I'll be going out to Grand Rapids in August with my rowing team for USRowing Master's Nationals). 

If anyone wants to get involved and repost about the blog hop, donate a block, or contributes to the Go Fund Me campaign there is a give away that will happen on August 2nd. Find more information by clicking on the button above which links back to Anna's blog, Life Sew Crafty, which has all the details. Anna's MIL has been very upbeat throughout the whole treatment process, but the one thing getter her down has been the medical bills, so if you've got the resources, think about donating. 


The block I created was a simple HST 16 patch. I love all the different patterns one can make with HSTs. This is a pink fabric that I've had in my stash for quite awhile, and now it's going to an excellent cause. I paired it with a pale pink solid from Art Gallery. The block is 12.5" square. I started with 4" squares of each fabric, drew the line down the middle, sewed my 1/4" seam on either side and cut. That's my favorite method of making HSTs. I like bold, geometric designs and the strong diagonals was the winner of the several layouts I auditioned. 


May 10
May 24

June 7

June 21

July 5

July 19

Saturday, May 10, 2014

New Quilt

This quilt is going to be a big one because in my head I was thinking each block was 10" rather than 12" square. So 98"x98" it will be. That said, I'm totally ok with that since I'm a big fan of all the fabric in it. The inspiration came from a snippet of a photo on pinterest, where this quilt was in the background, but it was easy to discern the pattern.

The original fabric that made me choose the others were from Riley Blake's Madhuri line then I added in Kate Spain Garden Party, Thomas Knauer Frippery, and Terra Australis.

The quilty math where I realized it was 12" rather than 10" that'd I'd had in my head (which is the size before the second sashing with colored rectangles). 
 All the center squares plus sashing rectangles. 
 The first two blocks done. I made these with regular piecing, the rest will be chain pieced, but I wanted to make a couple samples to ensure that they'd finish to 12.5" (and they do, perfectly!)
And Pippa because she was climbing all over while I was cutting and assembling.